Category Archives: Projects

IF I CAN DO IT…..SEW can you!

Make cushions, that is.I made some box cushions for our old wooden couch in the mountains last summer.

Here’s a quick “before” photo.

Blech.
We lived with these waaaay too long. No part of these cushions were salvageable.
I purchased 5″ in thick foam from JoAnn’s when it was on sale-still expensive-and cut it to size with an electric carving knife.
I didn’t realize until recovering my porch furniture cushions this summer that a better option would have been to buy thinner foam (2″ would have been fine) and put 2 layers of densified foam on either side of that for a softer, more comfortable and relaxed cushion.
Here are the cushions after:
Nicer and neater. Though, I think I should have left the wood wood. I still have to distress it. These cushions have zippers and piping. I am no expert and really tackling this project just takes some brain overload when your trying to piece the parts of the fabric and panels together. Once all the pieces are cut, zippers in their panels and piping prepared, each cushion takes less than an hour to sew.
I’ll post to the great tutorials that I relied on in another post. I just want to get this posted real quick so I can link to Elizabeth Foss’ sewing sharing post. I find these type of things so inspiring and had it not been for other bloggers posting about adventures in DIY, I would never have attempted to make these.
This summer, I’m working on my porch cushions, which I interrupted in order to make cushions for a friend. I learned something new when I took apart her previously professionally-made cushions….NO FOAM at all. Inside were just layers of densified foam….Go figure. This just proves that anything goes in upholstery.
What I hope you gain from this post is just plain inspiration. GO FOR IT! If you want any specific tips about different parts of such a project, email me or post a comment. I’ll try to help.
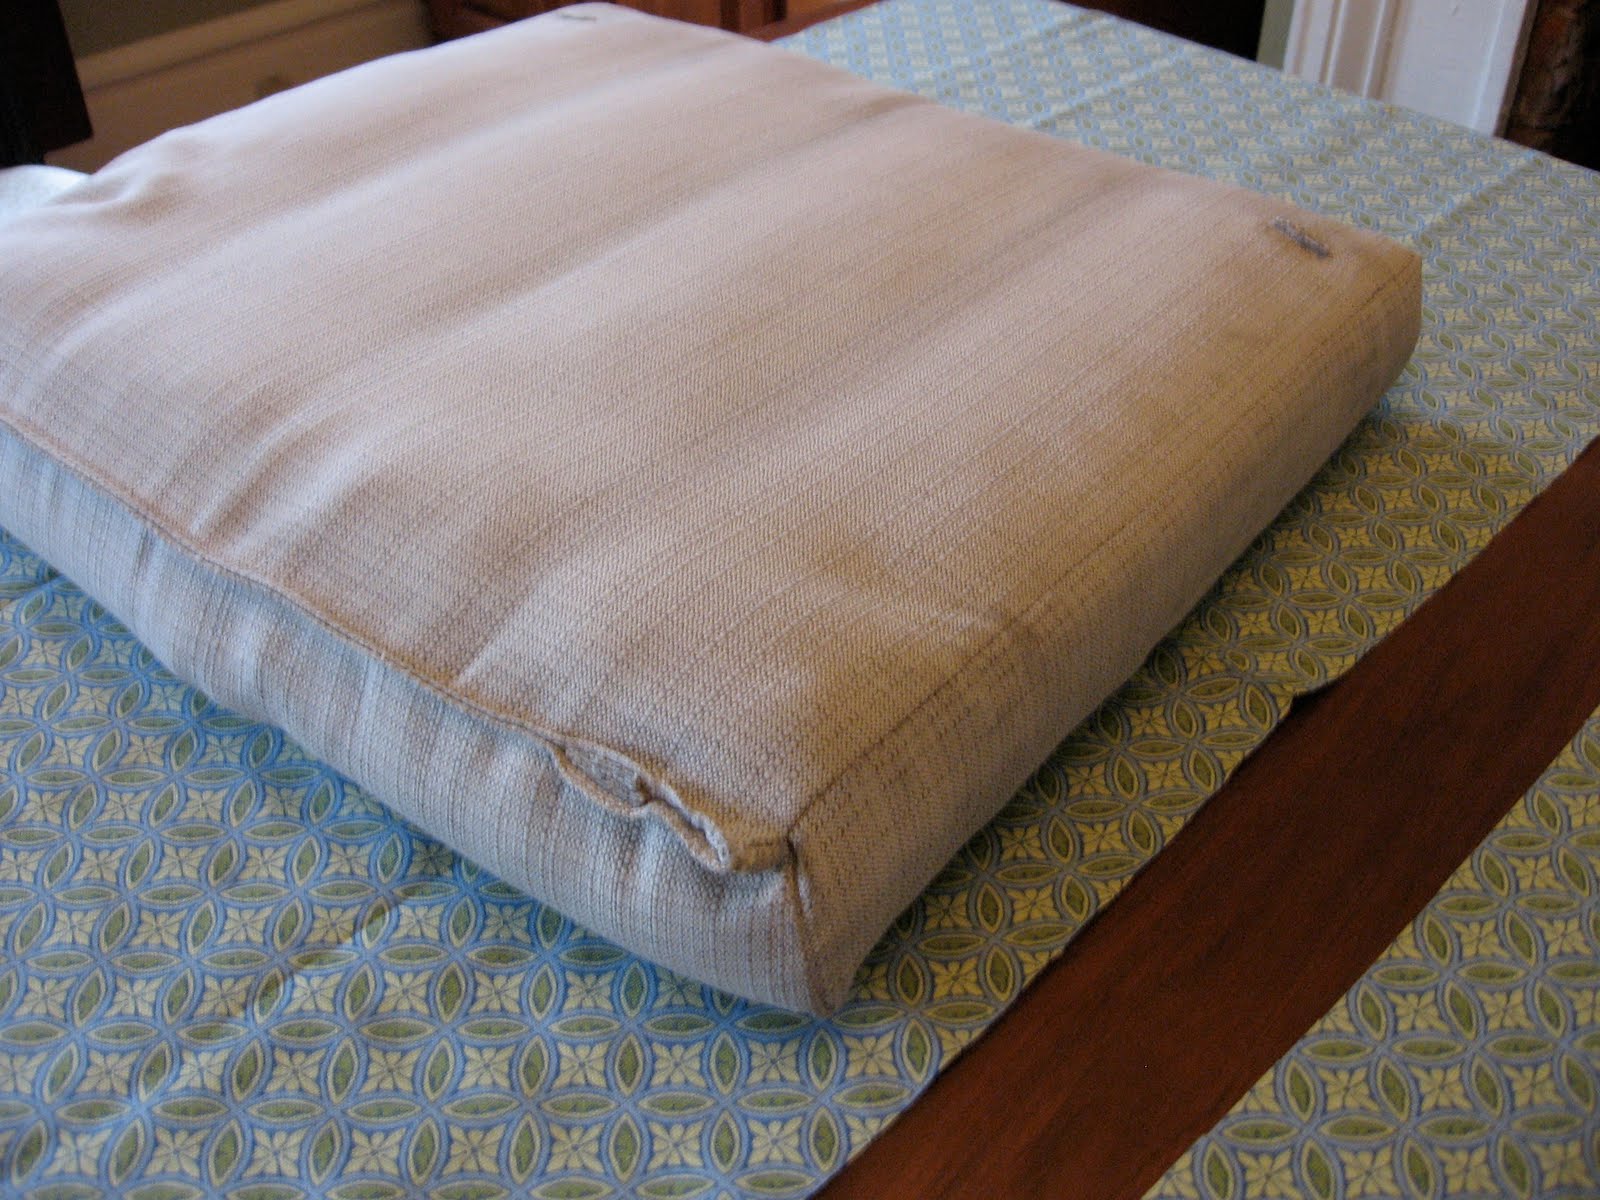
Here’s a photo of one of the completed cushions that I’m working on for my friend:
This is my porch couch. Notice the stain on my old cushion…I think a cat peed on them last year. But the densified foam inside is machine washable.
Here’s a photo showing the zipper and some detail on the side to protect/hide the zipper ends:
I love the fabric my friend picked out. It is outdoor canvas. I think I may have to steal the idea and we’ll have twin porches. She couldn’t find a plain fabric for the piping but found a nice stripe that coordinates beautifully.
Elizabeth doesn’t have a linky party but go check out the comments to this post to get some more inspiration.

Goals

My goal for 2012 is to set some goals. I have NEVER been a goal-setter. I literally did not know what “goals and objectives” meant until a brainstorming session for my sorority in college.I realize a “to do” list is sort of like setting a goal and I do have a few of those floating around. But I think goal-setting is more specific.

I’ve never been a “resolution” person so I rarely tune in to all those conversations and tid-bits about sticking to them.

For the past 2 years, I’ve been choosing words for the year and I still think that practice can be effective. Not sure whether I want to choose a new word or continue to work on facing fears.

Mark is all for setting goals with me. I like the accountability of making some things public so I probably will share a few of those goals….boring things like “get a stove”, “paint basement”, “replace floor outside of bathroom”. None of which promises to inspire, but hey, who knows?

I would like to post more regularly. Partly because I enjoy the act of writing. My memory stinks so I hope to write about the family more (always a tricky proposition) and also post about projects. I’ve been inspired so much by DIY bloggers that I hope to do the same.


A Cheap Bathroom Fresher-Upper

We are a family of 6. We have a TEENY bathroom. No storage, no drawers, no shelves, no closets. I measured the walk-around floor space (because who hangs out between the toilet and the sink?) and it is 4′ X 4′. We did have the bathroom remodeled (new sink, toilet, floor and paint) about 7 years ago. The “before” wasn’t completely heinous, I was just ready for a change.Yellow walls-white beadboard and trim. (Sorry ’bout the lighting-this room has one wierd, tiny window and would never have suitable light for photography-but you get the idea. YAWN!)

Yes, those are my paint swatches on the far left…I just slap it on.
Those hooks are just utilitarian. I love friends and family but there are no rules about hand-towel use.
I do love this floor
Simple, right?
 
Welcome to the “after”. 
 
I know, not that different but to me it’s a nice, big change.
Mark said this was my best paint job. Not to depress him, but these walls are the only ones that are relatively scar-free. Painting the rest of the rooms has been humbling and slightly depressing. Picture elephant skin and imagine yourself painting over it. Compared to that this was dreamy.
 
Wanna see what Kate did? She was saying one night that she wanted to paint a mural. If you know Kate, this is the kind of thing that she always says and never expects a “yes”. I had been wanting to paint a simple tree silhouette in the bathroom. I was partly inspired by this project at “Just a Girl” and this nursery. (No, I’m not expecting, this was linked a few months ago at one of the blogs that host DIY link parties and I loved the look-that’s inspiration.)
Even though I was initially inspired by Chris’ tutorial, which was done with a projector and more exact, Kate did this free-hand. She sketched a diagram of our bathroom complete with all the fixtures and showed me her design. I tweaked some things, told her what I had in mind and she went to work. She did a rough sketch with chalk-easy to correct- and then painted the outline and filled it in. I had to do the high parts. We want to add 2 more birds-one hanging upside down-which would roughly represent a certain member of the family. These are not angry birds but very calm and content.
Impressed by the symmetry? I was. Kate didn’t measure and I did not give any instructions to that effect. This girl has an eye.
The bathroom still needs a few more finishing touches (maybe gray towels, new shower curtain and rings) but it makes me smile every time I go in.
The gray color is Sherwin Williams “Morning Fog”. The tree was painted in slightly watered down SW “Westhighland White” and the birds are just an orange acrylic craft paint.
Linking up at:
shabby creek cottage
and
The Shabby Nest


Inexpensive Room Change!

I enjoy painting and I love SW paints. I’ve been waiting for this sale to come around again. This weekend is the 40% off super sale. This sale is super. Paint can be expensive-especially the good stuff. Even their little samples will be on sale if you’re not sure what color you need. You don’t have to paint this weekend but if you have a project hanging over your head, buy your paint this weekend. I read somewhere else that if you do the color visualizer on the website you can print an unlimited number of $10 off a purchase of $50. Even with the sale, you’ll likely spend more than $50.

Painting really doesn’t take that long. If you can get everyone out of the house, you really can paint a room in a couple of hours. Or if you can only get small windows of time, do a wall at a time. When I do it that way, I usually wrap my roller in plastic wrap. I do wash my brushes between sessions, though.

*Believe me, I’m not getting paid for this endorsement.

Edited to add, you can print the $10 off coupon without doing the color visualizer but you can’t use it with sale prices.


A New Look for the Entryway

This will be a quick post about painting my entryway. This is the second time I have painted this space since we moved in. I doubt that I have pictures of the original, original paint job. I know that the previous owners were going for a colonial period look since our house is about 150 years old. The walls were flat white and the trim was sort of a gray/green. Sounds cool but really didn’t fit my style.

Every other riser on the steps was stenciled. Everyone commented on it but it looked so country and I’ve never liked it.

Ugh…COUNTRY!

When I painted the hallway the first time around, I didn’t paint the stairs. I had it in the brain that I had to strip the stairs. That seemed like the only choice. Clearly, the steps were so banged up that I had to do something. I literally was just psyching myself up to start stripping the stairs a little at a time (I despise stripping wood) when I stumbled upon this post by Rhoda over at “Southern Hospitality” about how she repaired and completely transformed a set of stairs that had been covered by carpet. It had never occurred to me before to paint the stairs black and the risers white. I loved the look.

Once I decided to go with that look, I knew I needed to change the wall color. Here are a few before photos of the wall color

Pretty boring beige
 
Do you see that gray/green color on the floors? Picture that on the baseboards and on the molding trim pieces. It really was pretty hideous originally. I guess it was cool if you’re running a living history museum but we aren’t.
I decided on a light blue for the walls. That was tricky to get right. The first color I picked looked too baby boy room.

Here, you can sort of get an idea of the tone I was looking for.
I painted 3 coats of black on the floor and stairs. So far, it’s holding up fine. I did paint every other step so that we wouldn’t get trapped anywhere.
As you may be able to tell, I’m not a perfectionist and this paint job shows the age of the house. I don’t sand or repair before I paint-I just slap it on, baby. As a result, it’s a little bumpy in places. It suits me fine, though. Rhoda installed shoe molding where the riser meets the stair which looks great under her runner but I’m not going with the runner yet. Instead, I picked 2 indoor/outdoor rugs from Ballard Design in the same pattern.
So, here’s the “After”

My only complaint is that the stairs show dust and dirt and I have to wipe or vacuum them more often. Overall, I’m happy with the look of the room.
I’m linking to Chris’ “Show and Share” Day at “Just a Girl”. She’s been busy but it’s back. Go be inspired!


Converting Our Life to DVD

I borrowed a machine to convert our vhs-c tapes to DVD. My mom bought a video camera the summer before Hannah was born. Naturally, I adopted it.( Thanks, Mummy). I took a few days at the end of this summer to convert about half of the 60-odd tapes I recorded over the years to DVD. (Honestly I had to take a break and I may not be up to round 2 until next summer).

I have never been one to lug the video camera to the “memorable occasions” because I always just wanted to live and enjoy those moments. Instead, I almost always had the camera loaded and ready in case something funny or cute or interesting happened during our days together.

As a result, the tapes are AWFULLY BORING-but not to me. First, what I realized at the beginning of this project was that I was nauseated at the sound of my own, sing-songy, drippy sweet, mama voice. “GIVE THE BABY A NICE KISS!” “BIG GIRL!” “HOW BIG IS (INSERT CHILD’S NAME)?…..SOOOOOOOO BIG! I told my brother about this syndrome and he admitted that he said “SAY DADDA! SAY DADDA! SAY DADDA” before the babies could even see.

What struck me most, though, was how much I LOVED the mundane. I’m so grateful that I loved and enjoyed my time with the kids so much that I thought it worthy to whip out the video camera so I wouldn’t forget the everyday. I’m more grateful that I appreciated it enough to film than I am for the films themselves. (Don’t get me wrong-I love seeing the kids when they’re so little).

I loved being reminded that Luke has always had his own way of looking at the world. He’s also always been adorable and funny. Having the kids see how he inserted his own type of thinking and funny into the regular day helped them appreciate how he does the same thing now. I think it bumped up everyone’s tolerance for his sense of humor.

I love being reminded about how Hannah throws herself into everything with joy. I’m so happy I captured that.

I loved being reminded about how Mark has been so gentle and sweet with the kids since they were babies. This man was born to be a dad.

I loved being reminded about how vocal Kate was, even as a toddler….”WE’RE HAVING JELL-O, WE’RE HAVING JELL-O, WE’RE HAVING JELL-O!”

I loved being reminded about how SMILEY Mark was. Now I remember why I wasn’t worried about his failure to crawl and walk. He was so engaged and engaging. He’s smiling huge in every video when he was an infant…even when the others were sneezing, coughing and hanging all over him. Big smile! Oh how we’ve loved this boy!

Do you get it? I’m just so happy and grateful that I’ve known what my treasure is ALL ALONG! No tears watching those videos. Just relief that I’ve loved it and still love it.

When Mark watched them while they were playing, he asked….”Don’t you just wish you could have one day back?” Meaning go back in time to when they were young. Sure, I do. It’s a lesson and reminder in living in the present. Soak it all in. Appreciate what you have. Be Present!

But honestly. I really believe, this will be part of my heaven. I’ll go back to whatever days I want to, as many times as I want to-for eternity. Maybe even redo the bad days. “Dear God, I messed up on that day, could I relive it like I should have?”…..”Most certainly, this is your banquet, I thought you might want that…enjoy!”

My recording only goes to about when Mark is 4 or 5-maybe 6. I was thinking about this and beginning to regret that I’m not recording more of our lives now. The truth is, it wouldn’t be fair to sneak up on the kids with a video camera now the way I used to. (Yes, sometimes I turned the video camera on them when they were having temper tantrums or singing to themselves in their rooms.) They would never be as candid or tolerant of me recording the “spontaneous” as they were when they were little.

Had I worked for all of those years, surely I wouldn’t have known what I was missing. Likely, I would have been stressed about missing the “big moments”. Their first rollover, their first step, their first word, their first potty, their first day of preschool….whatever. When I say “stressed” I mean-not only to possibly miss those things but arranging my work schedule around things like the first day of preschool. There’s a huge chance I would have been too stressed to even care about those things. I’m so grateful that I chose the other path-that one that requires me to pitch the “Pottery Barn” and “Garnet Hill” catalogs in the trash as soon as they come. But that’s just the path I chose-and I’m grateful.

The gift of these tapes (now mostly on DVD) is realizing I’ve always been grateful for knowing how blessed I’ve been to be home with them. Instead of regretting those years I’ll never get back, I’m so happy to know those are years that can never be taken away.

Thrift Store Patio Set-Part II (Cushion edition)

Hannah,the photoshop genius, showed me how to make a watermark. Not that anyone’s going to steal this photo-just trying it out.


Last week, I posted about the thrift store patio table that I dragged home and painted last summer. I didn’t have the time and inclination to cover the cushions last year because the ones that came with the set were decent enough.

Finally, this summer, I was ready to tackle the project. I decided how I was going to do it, got some fabric at Joann’s with a 40% off coupon and spent the better part of 3 days covering the existing cushions. I didn’t choose a weatherproof fabric because of the expense and the fact that we store the cushions on the porch.

Here’s the finished product…..

I really loved the fabric for the back cushions but decided to use a coordinating plain fabric for the seat cushions. Admittedly, I think I would have preferred a darker blue but-oh well. Did I mention I installed ZIPPERS and PIPING?! I figured out those 2 things by studying a few blog tutorials and youtube videos, figuring a few things out myself and just going for it. Also, with the piping, I worked with small sample pieces to see how it came together.

I am always inspired by DIY bloggers who try something without much experience. I’m especially inspired when the project involves power tools or sewing. I have sewn straight things like Halloween costumes out of fleece but never anything complicated. I have to admit, it took me a while to visualize how I wanted to cover the cushions but once I decided on a method, I went with it.

It’s as basic as design as you could get. Picture a big pillowcase (2 rectangles) sewn together for the back cushions and the ends secured sort of like a present, tucked the corners in and velcro on one end so I can wash the covers.

I learned how to use the zipper foot for my machine and used it for the piping and obviously the zippers.

      See how the zipper foot allows the needle to get snug agains the cord to sew piping? I got this tip from Centsational Girl. (Thanks, Kate)-This photo shows making the “piping sandwich” on the bottom cushions.
 
Let me encourage you…if I can do this with my limited sewing experience, anyone can. The best part is that it gives me momentum to try something similar and even a notch more difficult.
I don’t have a lot of readers but if enough people express interest, I’d be happy to post a more detailed tutorial about the process.
I’m linking to these blogs-check them out-they always have great ideas. Maybe you’ll be inspired. Enjoy these last weeks of summer! With our school year fast approaching, I’ll likely put the DIY projects on the back-burner but I accomplished some others that I didn’t take the time to post about and I’ll do that when we hit the books again because they’re already done!


Thrift Store Patio Set-Part I

Last summer we were shopping for a patio table. I was having no luck finding something affordable and durable. For our family of six, even the discount department stores didn’t have anything less than $500+. The more expensive options were just too big and bulky for the space in our side yard. I was resigned to spending almost $600 for something I knew wouldn’t hold up over the years. Then, I spotted this set at our local thrift store…

Here’s the table sitting on our someday”patio”- one step at a time-folks!
I swear I took before photos of the chairs, too. I can’t find them so just picture white metal chairs and whitish cushions. The thrift store deal was a table, 6 chairs and an umbrella and base all for $149.99. No doubt, that’s high for donated furniture but I really didn’t want to take a chance of losing what I was looking for. I called Mark, told him I couldn’t pass it up, called another friend to help me haul. Three trips later-this thing and it’s accessories were sitting in my yard.
If it hadn’t been for my discovery and obsession with DIY posts like this at Centsational Girl, and this at  Thrifty Decor Chick and many, many more creative blogs, I would have never given this tired and slightly skeevy patio set a second look.
I just never would have known that you could actually spray paint some old metal thing to look like something factory-made and just about brand new.
Even Mark was skeptical when I called him and when he came home to see what I had dragged home.
I bought some “hammered bronze” spray paint, enlisted the kids. Suited up (with masks) and had at it.

This is one chair with the plastic arm rests removed. 
 

Another chair disassembled. Only 2 had this different construction-2 pieces-they bounce!

Paint squad
The spray painting part of the project took about 3 days. I was able to remove the tempered glass to get a good shot at the table but everything dried really fast. I applied 2 coats to everything.
Here’s what the set looked like after….

Aww- Come On!
(Did you notice my drab garden table-premakeover in the background?)
 
What a bargain! I love this table and chairs. It’s perfectly proportioned for the space. Comfortable, durable and almost new looking. As much as I wanted to deal with the cushions, I definitely had to psyche myself up for that project. I’m not a seamstress but, you know what? I finally did those, too and I’ll post about those next week.
Just to be clear… I found the set in the summer of 2009, painted it then and redid the cushions this summer (2010). I’m slow. Check out those thrift stores and PAINT SOMETHING!
I’m linking to these great blogs-check them out!


Dressing Up a Sewing Table

After I saw Sarah’s sewing table redo last summer and told a friend about it, that same friend gave me a spare sewing table from her basement and I copied Sarah’s as much as I could. Mine did not have the sleek legs that Sarah’s did but I loved her shape (table-not Sarah’s-though Sarah I’m sure has a lovely shape) nonetheless. This post does not need a long step-by-step tutorial, I’ll just post photos with captions-that should do it. I won’t do to you what Mark tried to do to me when he made a hole-in-one a bunch of years ago.
Mark: “Do you want to know how golf went today?”
Me: “Sure!” (Please don’t tell me every shot club-by-club).
 
Mark: “I got my first hole-in-one.”
Me: “Wow! That’s awesome! Congratulations!” (This was with sincerity-I haven’t played a lot of golf-but a hole in one is rare).
Mark: “Can I tell you about the hole?”
Me: “Let me guess….you teed off and the ball went in the hole. Can there be much more to the story?”
Mark: “Well actually…..” (there was a tad more to the story but I won’t go into it here. It involved a rolling golf ball).
What I’m getting at is….this makeover basically involved sanding, priming (which knowing better now-I’d skip) and spray painting with flat black.
Here she is looking all plain, naked and sad. Doesn’t it look like she’s one-eyed?
Looks like somebody had a fight with an electric sander AND LOST!
DING-DONG! Looks like somebody got caught in their unmentionables! Where’s your robe, honey?
Whhhheet, whhhherl ! (that’s an objectifying cat-call whistle) All dressed up and no where to go!
Here’s another view….
Don’t mind the specks-either from the camera or one of the kids spilled something on the table-whatever.
By the way-these sewing tables are always at our local thrift store. I picked up another for $10 to paint as a side table in our basement almost room. I’d love a useable sewing machine-apparently those old models are workhorses and great for upholstery projects-one of these days…..
I’m posting at the CSI project.
Visit thecsiproject.com

A Quick Lamp Makeover

Once again, “quick” is relative here, since this project was 17 years in the making. Once the inspiration hit, though, it was completed in less than an hour, including drying time. The spraying took about 10 minutes, taping took about 5.
Does everyone married in the 90’s have one of these?
 
 I have HATED this lamp since we got it as a wedding present. I told myself I liked it when it came out of the box because I was informed by my mother-in-law that it was an expensive lamp and that her friends who gave it to us were so generous to spend that much. So, for 17 years, it’s been the main source of light in our living room. Blah. Reading do-it-yourself blogs has contributed to a new level of contempt for brass…can I hear an “Amen”?!
check out that SPARKLE! It’s like an Orbit gum ad!
 
The shape of the lamp is nice, so I found a can of Oil Rubbed Bronze spray paint in the basement, taped off the cord and the business end of the lamp and had at it. I had every intention of dusting the lamp first but I think I forgot. Oops!
I sprayed 2 coats on lightly with about 15 minutes in between to let it dry. I forgot about it for another 30 minutes and it was ready for the new shade. I picked up the barrel shade at Target for another lamp ($20) but it didn’t fit. The shade’s a little darker than I wanted but I didn’t want the brighter white one.
I think it looks so much better. I’m sick of the wall color in this room but that’s a project for another day.
Another view…. it looks black in the photo but IRL it looks more metallic and bronzish. Because I’m impatient, the brass is peeking through in a couple of spots but it looks like it’s supposed to be that way.I’m satisfied with the cost of this project about $23 total. These kind of lamps are in thrift stores and yard sales all the time, I guess I’m not the only one who doesn’t love brass.


I’m linking to Frugal Friday’s over at the Shabby Nest and Frugalicious Friday over at Finding Fabulous. Check out these blogs…lots of inspiration. I’ll link to Show and Share Day at “Just a Girl“(one of my favorite blogs) when Chris returns from vacation.